
There is nothing quite like the feeling of parking your rig on a steep incline to take in a mountain view, only to feel it creep backward.
For owners of the Honda Pioneer 700, including the freshly updated 2026 models, maintaining the parking brake is not just about convenience; it is a critical safety protocol.
While Honda has quietly rolled out exciting updates for the 2025-2026 lineup—including upgraded power steering, new “TrueTimber Atera Camo” colorways, and enhanced bed lighting—the mechanical heart of the parking system remains a classic cable-actuated design.
This traditional setup is reliable, but it is prone to cable stretch over time, especially after heavy hauling or aggressive trail riding.
Why Your Parking Brake loses Tension
Before grabbing your tools, it is helpful to understand why this happens.
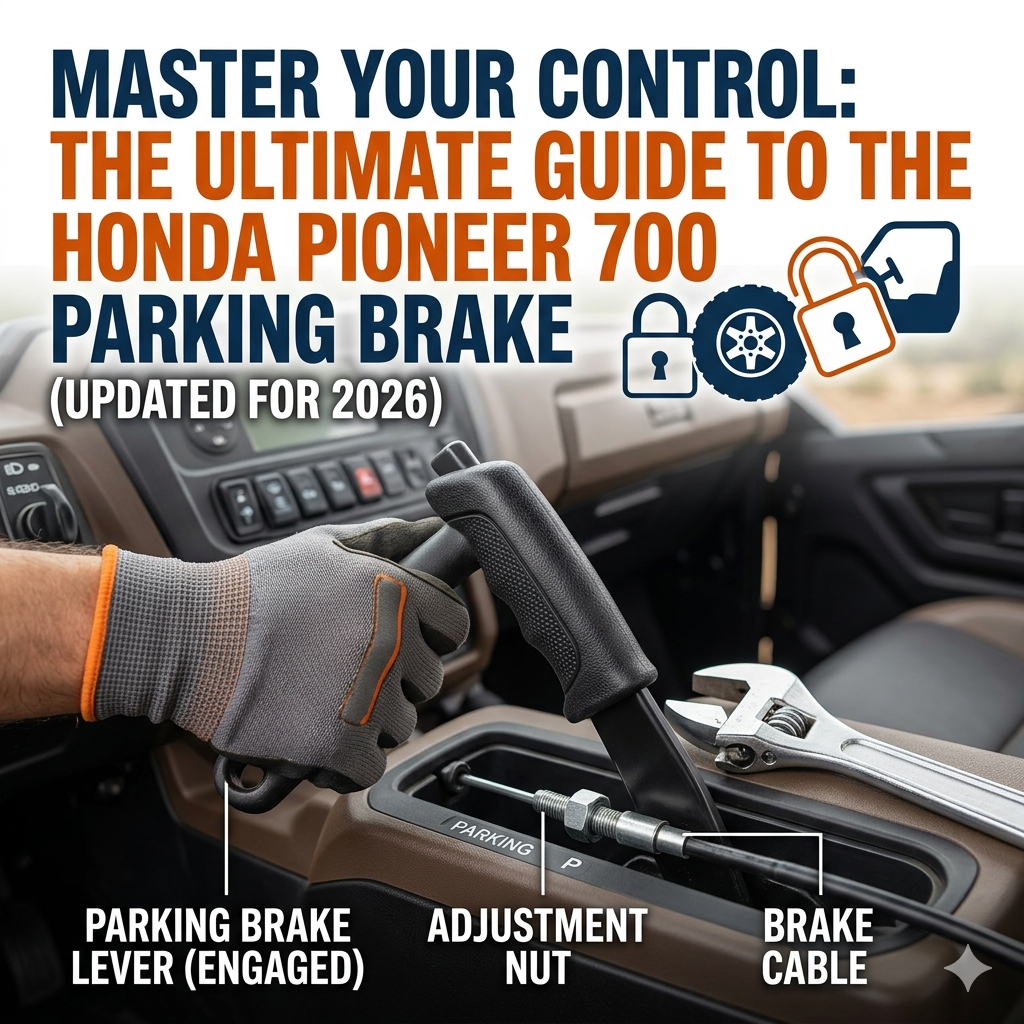
The Honda Pioneer 700 utilizes a mechanical cable that runs from the hand lever inside the cab directly to the rear brake caliper.
Over time, the steel strands inside the cable sheath stretch under tension, and the brake pads themselves wear down, creating slack in the system.
This slack results in a lever that pulls all the way to the plastic console without actually locking the rear wheels.
Fortunately, Honda engineers have designed two points of adjustment to combat this issue: a minor adjuster at the lever and a major adjuster at the caliper.
Tools Required for the Job
You do not need a professional shop to perform this maintenance.
Gather these simple tools before you begin:
- Floor jack and jack stands (Safety is paramount).
- Wheel chocks for the front tires.
- A 12mm or 14mm wrench (depending on your specific model year).
- Pliers (optional, for gripping the wing nut if it is stubborn).
- Clean rags and penetrating oil (if the machine has seen a lot of mud).
Step 1: Safety and Prep
Park your Pioneer 700 on a flat, level concrete surface.
Place wheel chocks tightly against the front tires to prevent any forward movement.
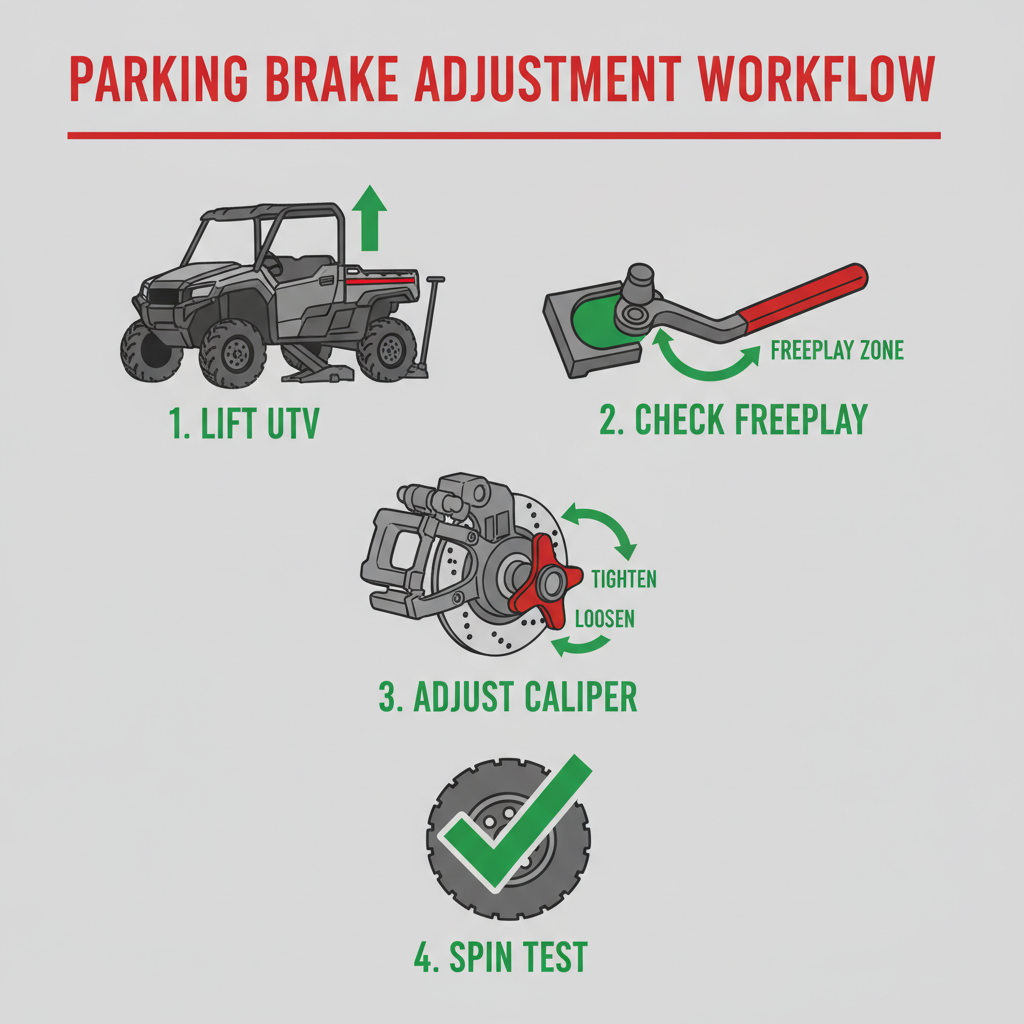
Using your floor jack, lift the rear of the machine until the rear tires are just off the ground.
Check out our off-road collection Amazon products
CRITICAL: Never rely solely on the hydraulic jack; always lower the vehicle onto jack stands positioned under the frame before crawling underneath.
Shift the transmission into Neutral so the rear wheels can rotate freely.
Step 2: Inspecting the Freeplay
Hop into the driver’s seat and test the current state of the lever.
Pull the parking brake lever up slowly and count the “clicks.”
A properly adjusted Honda Pioneer 700 parking brake should engage fully between 3 to 5 clicks.
If you can pull the lever up 6 or more clicks, or if it hits the top of the travel slot without significant resistance, you need to tighten the system.
Step 3: The Major Adjustment (At the Caliper)
Most significant slack needs to be removed at the source: the rear brake caliper.
Locate the rear brake caliper, which is mounted on the rear output shaft or wheel hub assembly depending on your specific sub-model (Deluxe vs. Forest).
Follow the black cable to where it attaches to a lever arm on the caliper body.
You will see a threaded rod end with a wing nut or a hex nut; this is your primary adjustment point.
Turn this nut clockwise to shorten the effective length of the cable.
Rotate it two or three full turns, then check the tension on the lever arm.
Step 4: Fine-Tuning (At the Lever)
If the caliper adjustment got you close but not perfect, move to the cab.
On some Pioneer 700 models, there is a barrel adjuster located near the base of the hand lever.
Loosen the lock nut and rotate the barrel counter-clockwise to push the housing away, tightening the internal wire.
This is best for “on-the-trail” tweaks rather than taking up major slack.
“A well-adjusted brake is the difference between a parked rig and a runaway coaster.”
Step 5: The Verification Spin Test
Return to the rear of the machine with the tires still in the air.
Ensure the parking brake lever is fully released (down position).
Spin the rear tires by hand; they should rotate freely with zero drag or grinding noise.
If you hear dragging, you have over-tightened the nut and need to back it off slightly.
Next, engage the parking brake lever 1 click; you should feel slight resistance when spinning the tire.
Engage it to 3 clicks; the tire should be impossible to rotate by hand.
Check out our off-road collection Amazon products
| Symptom | Probable Cause | Solution |
|---|---|---|
| Lever pulls to top with no hold | Excessive Cable Stretch | Perform Major Adjustment at Caliper |
| Brakes smell like burning rubber | Over-tightened Cable | Loosen caliper nut 2 turns |
| Lever feels “sticky” | Corroded Cable or Dirt | Lubricate cable sheath or replace |
Maintenance for Longevity
The 2026 Honda Pioneer 700 is built for durability, but mud is the enemy of moving parts.
After deep mud riding, spray out the spring mechanism on the rear caliper to prevent the adjuster from seizing.
Apply a small amount of waterproof grease to the exposed threads of the adjuster rod.
Regularly inspecting your brake pads is also vital, as worn pads require the cable to travel further to engage, simulating a stretched cable.
https://www.youtube.com/watch?v=uDk_g6V04iQ
When to Replace the Cable
Sometimes, no amount of adjusting parking brake honda pioneer 700 steps will work.
If you have maximized the threads on the caliper adjuster and the lever is still loose, your cable has stretched beyond its service life.
This is common in older units (2014-2018) or machines used for heavy towing.
Replacing the cable is a straightforward 30-minute job that restores that “like-new” snap to the lever.
“Don’t wait for the hill to tell you your brakes are gone.”
By keeping this system tight, you ensure that your Pioneer stays exactly where you left it, whether you are hauling feed on the farm or taking a lunch break on the trail.
For more detailed guides on maintaining your Honda SXS, check out the official resources and community forums.
External Resources:
Official Honda Pioneer 700 Page
🔍 Explore More: See all Wild Testing guides for adjusting parking brake honda pioneer 700.
Check out our off-road collection Amazon products

- Genuine Honda Type 2 Long-Life Blue Coolant, pre-mixed 50/50 (ready to use)
- Protects metal and non-metal cooling system parts against corrosion and rust
- Freeze protection and boil-over resistance for extreme temperature performance
- Formulated specifically for Honda HEV vehicles for motor cooling and clutch lubrication
- Honda HEVF Type 1.0 is the only HEV fluid approved by Honda for use in Honda vehicles
- Low-viscosity formulation provides cooling performance and helps improve fuel efficiency

- 5 year/150, 000 mile . Silicate-free, long-life, phosphate Hybrid Organic Acid Technology chemistry
- Formulated to replace the OEM fluid in Asian make vehicles such as Honda, Nissan, KIA, Hyundai and others requiring a bl…
- The long life formula provides protection for all cooling system metals from rust and corrosion. The silicate free, bora…