


Picture this: You’re tearing through a desert trail in your Can-Am Maverick R, the engine roaring as you conquer challenging terrain. Suddenly, a cloud of dust kicks up from the vehicle ahead, or perhaps an unexpected rain shower begins.
Without a proper front windshield, that dust or rain hits you directly in the face, turning an exhilarating ride into an uncomfortable ordeal.
I learned this lesson the hard way during a spring ride through muddy trails when a fellow rider’s rooster tail of mud splattered across my face shield. That day, I promised myself I’d never ride my Maverick R without proper protection again.
A quality Can-Am Maverick R front windshield isn’t just an accessory—it’s an essential upgrade that transforms your riding experience. Whether you’re battling dust, deflecting debris, or simply wanting protection from the elements, the right windshield strikes that perfect balance between protection and maintaining the open-air freedom that makes UTV riding so addictive.
In this comprehensive guide, I’ll walk you through everything you need to know about selecting, installing, and maintaining the perfect front windshield for your Can-Am Maverick R. From material choices to mounting options, I’ve got you covered with insights gained from countless trail miles and conversations with fellow enthusiasts.
Let’s dive in and find the perfect windshield solution for your riding style!
Why Your Can-Am Maverick R Needs a Quality Front Windshield
The Can-Am Maverick R is an engineering marvel designed to tackle the toughest terrain with impressive power and handling. But even the most capable machine has its limitations when it comes to rider comfort and protection.
Without a front windshield, you’re exposed to a barrage of challenges that can diminish your riding experience:
First, there’s the constant assault of dust and debris. The Maverick R’s impressive suspension allows you to maintain speed through rough sections, but that same capability means you’re stirring up more trail material. A quality windshield creates a protective barrier that prevents these particles from reaching your face and eyes.
Then there’s the weather factor. Mother Nature is unpredictable, and a sudden rain shower can turn a pleasant ride into a miserable experience without proper protection. Even on sunny days, the windshield provides valuable protection from wind fatigue during longer rides.
I remember a particular autumn trail ride in the mountains when temperatures dropped unexpectedly as the sun began to set. Without my full windshield installed, the bone-chilling wind would have cut our adventure short. Instead, we continued comfortably as the protected cabin retained engine heat and kept the biting wind at bay.
Beyond comfort, there’s also the safety aspect. Rocks, branches, and other trail debris can become dangerous projectiles at speed. A proper windshield provides an important first line of defense against these potential hazards.
The beauty of modern Can-Am Maverick R front windshield options is that they don’t compromise the open-air experience that makes UTV riding so enjoyable. Today’s designs offer various configurations that balance protection with ventilation, allowing you to customize your experience based on conditions and preferences.
Understanding Can-Am Maverick R Front Windshield Types: Which is Right for You?
Not all windshields are created equal, and choosing the right type for your riding style is crucial for maximizing enjoyment and protection. Let’s explore the main categories to help you make an informed decision.
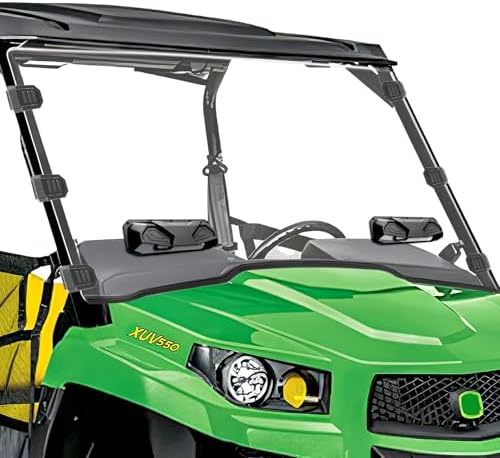
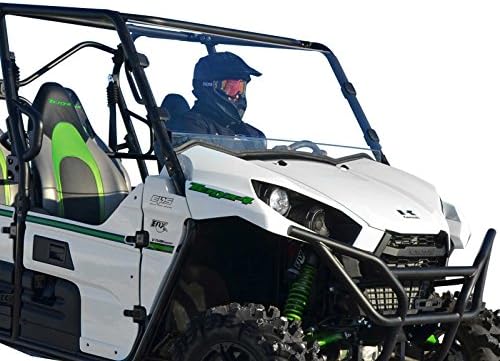
Full Windshields: Maximum Protection for All Conditions
Full windshields provide complete coverage from the hood to the roof of your Maverick R, offering the highest level of protection against the elements. They’re particularly valuable for riders who frequently encounter harsh weather conditions or ride in dusty environments.
The primary decision when selecting a full windshield is the material: glass or polycarbonate.
Glass full windshields offer superior optical clarity and scratch resistance. Typically made from AS1-rated DOT-approved safety glass with a slight tint, these windshields provide distortion-free visibility even after years of use. The downside? They’re heavier than polycarbonate alternatives and, as one forum user discovered during an aggressive ride, can potentially shatter under extreme conditions.
Polycarbonate full windshields, on the other hand, offer impressive impact resistance while being significantly lighter than glass. Available in both standard and scratch-resistant (hard-coated) versions, they provide excellent protection with less weight penalty. The premium scratch-resistant versions are particularly worth considering, as they maintain clarity much longer under regular use.
Vented Windshields: The Perfect Balance of Protection and Airflow
For many riders, vented windshields represent the ideal compromise between protection and ventilation. These innovative designs incorporate adjustable vents or sliding panels that allow you to control airflow based on conditions.
The primary advantage of vented windshields is their versatility. On cool mornings or during rain, you can close the vents for maximum protection. As temperatures rise or when you want more of that open-air feeling, simply open the vents to allow refreshing airflow without sacrificing debris protection.
Vented designs also excel at preventing fogging—a common issue with full windshields during temperature changes or in humid conditions. The controlled airflow helps maintain clear visibility by allowing warm, moist air to escape rather than condensing on the windshield surface.
Most quality vented windshields for the Maverick R feature tool-free adjustment mechanisms, allowing you to modify airflow on the fly without stopping your ride. This adaptability makes them particularly valuable for day-long adventures where conditions might change significantly.

Hinged and Flip Windshields: Adaptability on the Trail
For the ultimate in versatility, hinged and flip windshields offer multiple configuration options in a single product. These innovative designs can typically be positioned in several ways:
– Fully closed for maximum protection
– Partially open for increased ventilation while maintaining some protection
– Fully open for a completely unobstructed experience
Traditional hinged windshields use manual mechanisms with support struts or detents to hold the windshield in your chosen position. They’re relatively affordable and simple to operate, though they do require stopping your vehicle to make adjustments.
At the premium end of the spectrum are power flip windshields, which incorporate electric motors controlled by dashboard-mounted switches. These allow you to adjust your windshield position on the fly without stopping—a genuine luxury during changing conditions.
The downside to hinged designs is their increased complexity compared to fixed windshields, with more moving parts that could potentially require maintenance over time. However, for riders who experience varied conditions or simply appreciate options, this trade-off is well worth it.
Glass vs. Polycarbonate: Choosing the Right Material for Your Riding Style
Beyond the configuration of your windshield, the material choice significantly impacts performance, durability, and maintenance requirements. Let’s examine the pros and cons of each option to help you make the right choice for your riding style.
Glass Windshields: Clarity and Scratch Resistance
Glass windshields for the Can-Am Maverick R typically use AS1-rated laminated safety glass similar to what’s found in automotive applications. This material offers several distinct advantages:
First and foremost is optical clarity. Glass provides distortion-free visibility that remains consistent over time, with no yellowing or hazing that can affect some polycarbonate options. This clarity is particularly valuable during technical riding where precise terrain assessment is crucial.
Glass also offers superior scratch resistance compared to standard polycarbonate. For riders who frequently encounter brush or who are concerned about windshield wiper use, this resistance to scratching is a significant benefit that keeps your windshield looking new longer.
The downsides? Glass windshields are typically heavier than their polycarbonate counterparts, adding weight to your vehicle. They’re also more prone to shattering under extreme impacts, as one forum user discovered during an aggressive ride through whoops. While most manufacturers offer warranty coverage for such occurrences, being stranded on the trail with a shattered windshield is never ideal.
Polycarbonate Windshields: Lightweight Durability
Polycarbonate has become increasingly popular for UTV windshields due to its impressive combination of impact resistance and light weight. For the Can-Am Maverick R, polycarbonate options offer several compelling benefits:
The material’s exceptional impact resistance makes it virtually shatterproof under normal riding conditions. This durability provides peace of mind when tackling rough terrain where debris impacts are common.
The lighter weight of polycarbonate (typically 250% lighter than equivalent glass) means less mass added to your vehicle, which can be beneficial for performance-minded riders concerned about weight distribution and handling.
The primary drawback of standard polycarbonate is its susceptibility to scratching. However, this concern is largely addressed by hard-coated (scratch-resistant) options, which incorporate a special treatment that significantly improves scratch resistance while maintaining the material’s impact resistance and light weight.
When selecting a polycarbonate windshield, I strongly recommend investing in a scratch-resistant version. The modest price increase is well justified by the dramatically improved durability and maintained visibility over time.
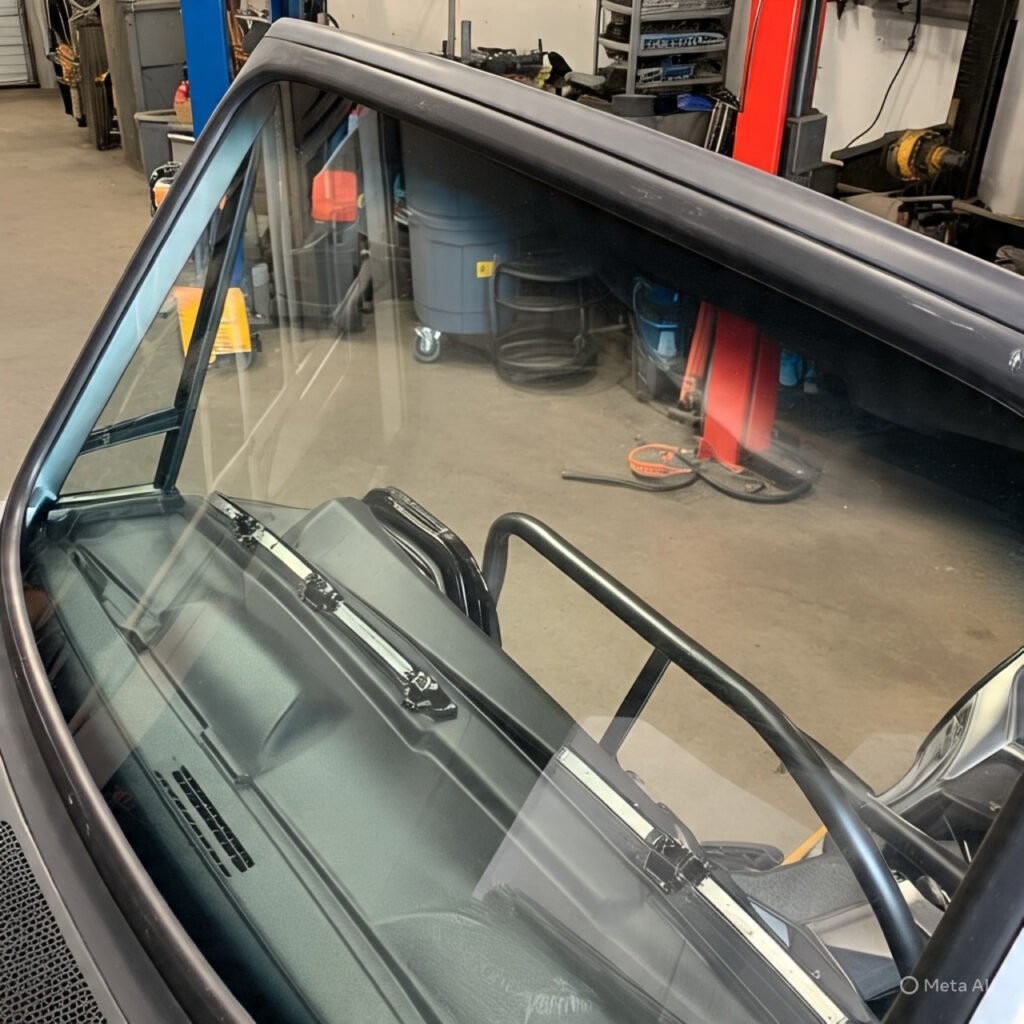
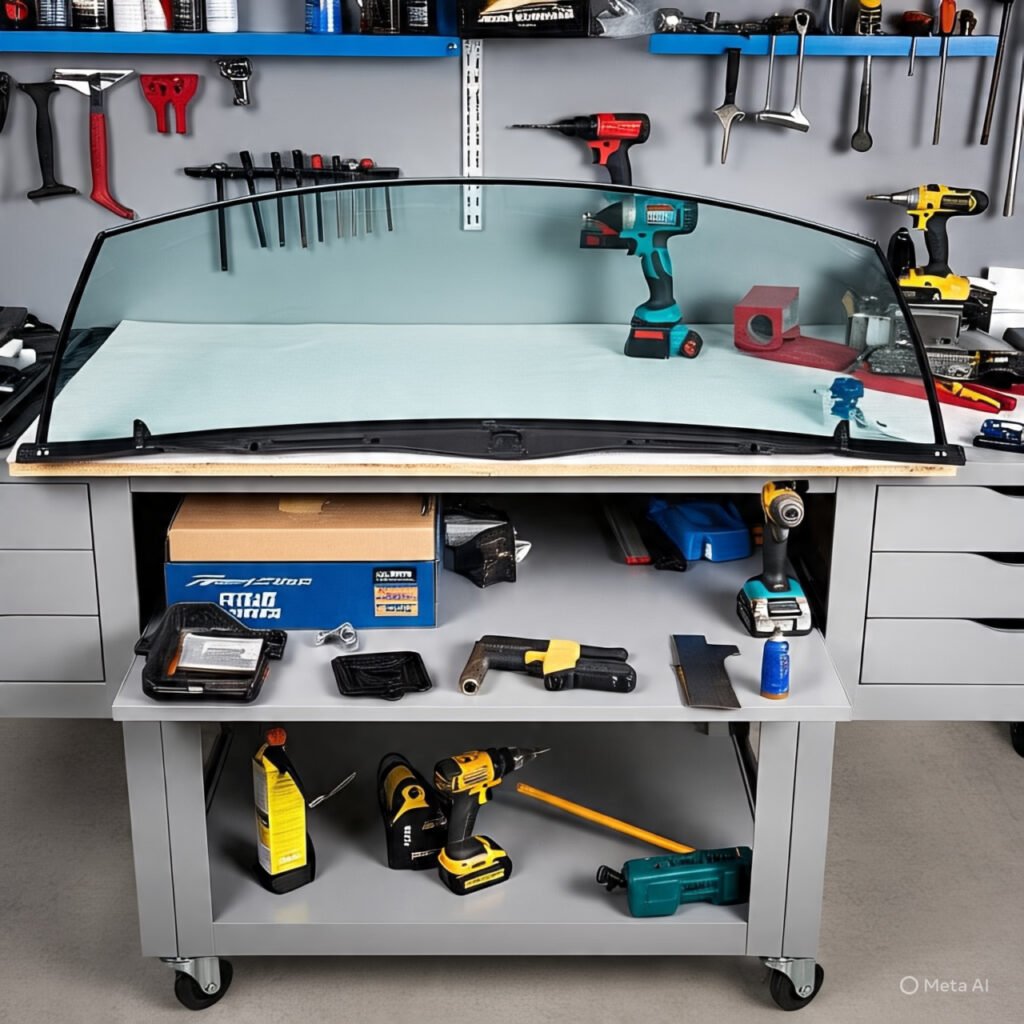
Installation Guide: Mounting Your Can-Am Maverick R Front Windshield Like a Pro
Even the highest quality windshield won’t perform properly if installed incorrectly. Fortunately, most windshields designed for the Maverick R are engineered for straightforward DIY installation. Here’s how to ensure a perfect fit and finish.
Essential Tools and Preparation
Before beginning installation, gather these tools and materials:
– Socket set and/or wrenches (metric and standard)
– Screwdrivers (Phillips and flathead)
– Clean microfiber cloths
– Isopropyl alcohol for surface cleaning
– Thread locker (medium strength)
– An assistant (optional but helpful for handling larger windshields)
Take time to thoroughly read the manufacturer’s instructions before starting. While the general process is similar across products, specific torque specifications and mounting hardware can vary significantly.
Prepare your workspace by ensuring you have good lighting and enough room to maneuver around your vehicle. Remove any accessories that might interfere with windshield installation, and clean the mounting surfaces thoroughly to ensure proper sealing and adhesion.
Step-by-Step Installation Process
While specific details vary by manufacturer, here’s a general guide to installing a typical Can-Am Maverick R front windshield:
1. Begin with preparation: Clean the mounting surfaces on your roll cage with isopropyl alcohol and allow to dry completely. This ensures proper adhesion of any rubber gaskets or seals.
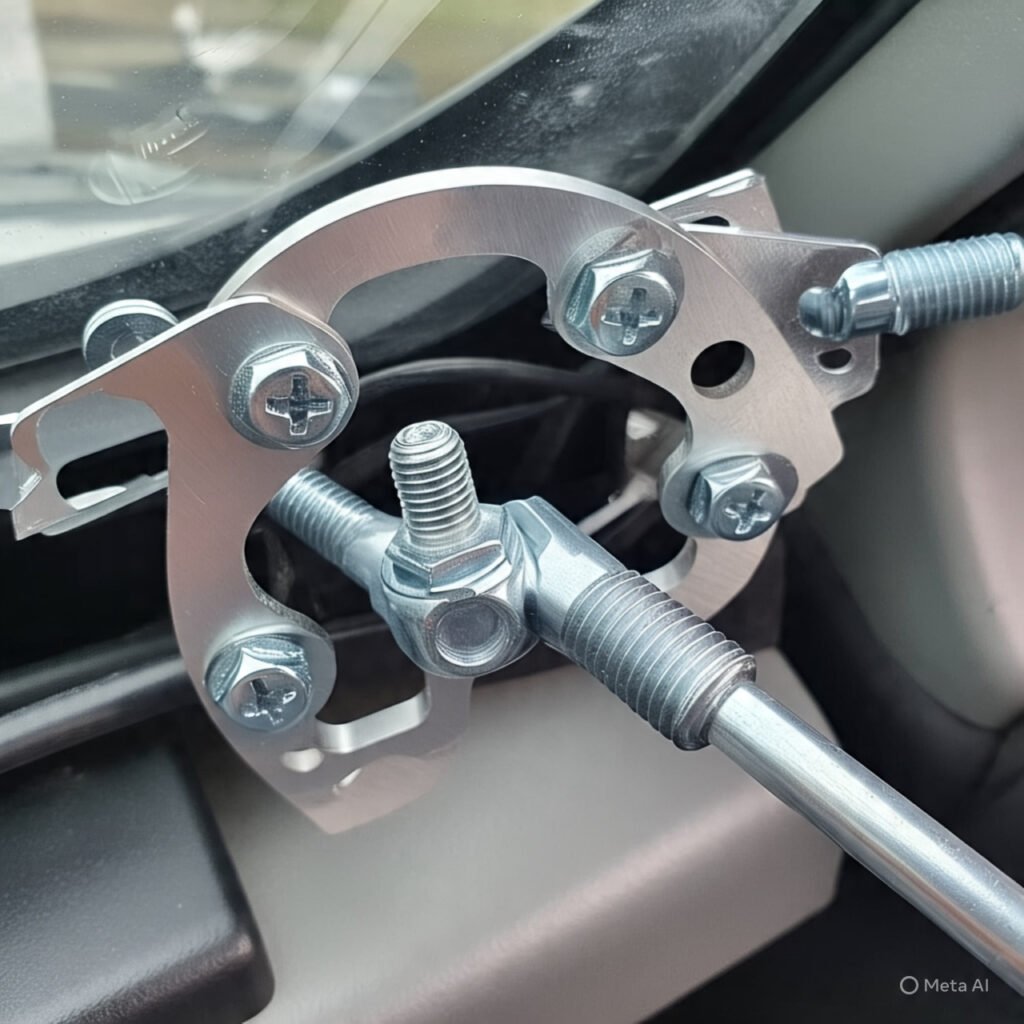
2. Attach mounting clamps or brackets: Most windshields use clamps that attach to the roll cage. Position these loosely at first, following the manufacturer’s placement guidelines but don’t fully tighten yet.
3. Apply weather stripping or gaskets: If your windshield includes rubber seals or weather stripping, install these according to instructions. Proper sealing prevents water intrusion and eliminates annoying rattles.
4. Position the windshield: With help from an assistant if available, carefully position the windshield onto the mounting brackets. For heavier glass windshields, an extra set of hands is particularly valuable here.
5. Secure initial mounting points: Loosely attach the windshield to the mounting brackets, ensuring proper alignment before proceeding.
6. Check alignment: Before final tightening, verify the windshield is properly centered and aligned with your vehicle. Check that all edges align properly with the cage and that the windshield sits flush where intended.
7. Apply thread locker and tighten hardware: Once alignment is confirmed, apply a small amount of medium-strength thread locker to bolts before final tightening. This prevents vibration from loosening the hardware over time.
8. Tighten in a cross pattern: Similar to tightening lug nuts on a wheel, work in a cross pattern when tightening windshield hardware to ensure even pressure distribution and proper sealing.
9. Perform final inspection: Check all mounting points for security and proper alignment. Verify that any rubber seals are properly seated and that the windshield doesn’t contact any painted surfaces that could be damaged by vibration.
One common installation mistake is over tightening hardware, which can crack mounting points or warp the windshield material. Always follow manufacturer torque specifications, and when in doubt, aim for “snug” rather than “tight.”
Compatibility Considerations
Before purchasing any windshield for your Maverick R, it’s essential to consider how it will interact with your existing accessories.
Roof compatibility is a primary concern. Some windshields may not work with certain aftermarket roofs or with the factory cold air roof scoop. Based on forum research, most windshields are compatible with the factory roof, but always verify specific compatibility before purchasing.
Wiper kits present another potential compatibility issue. If you plan to add a wiper system, ensure your chosen windshield supports this addition. Some glass windshields come pre-drilled for wipers, while others may not accommodate them at all.
Side mirrors can also create installation challenges. Certain windshield designs may interfere with mirror mounting points, particularly those with thicker clamps. Some manufacturers recommend specific mirror brands known to work with their windshields, while others suggest modifications to accommodate existing mirrors.
Maintenance Tips: Keeping Your Windshield Clear and Functional
Proper maintenance ensures your Can-Am Maverick R front windshield remains clear and functional for years of trail adventures. The specific care requirements depend primarily on your windshield material.
Material-Specific Cleaning Methods
For glass windshields, cleaning is straightforward. Standard automotive glass cleaners work well, though I prefer ammonia-free formulations as they’re less likely to affect any surrounding plastic components or seals. A microfiber cloth is ideal for streak-free cleaning without scratching.
Polycarbonate requires more careful attention. Never use ammonia-based cleaners, household glass cleaners, or products containing solvents on polycarbonate, as these can cause crazing, cracking, or hazing of the surface.
Instead, use cleaners specifically formulated for polycarbonate or a simple solution of mild dish soap and water. Apply with a soft microfiber cloth, using minimal pressure to avoid scratching. For drying, use a clean microfiber cloth rather than paper towels, which can leave tiny scratches over time.
For both materials, avoid cleaning when the windshield is hot from direct sunlight, as this can cause cleaners to evaporate too quickly and leave streaks or residue.
Anti-fog treatments can be valuable additions to your maintenance routine, particularly for full windshields. These products create a thin film that prevents moisture condensation, maintaining visibility in changing temperature conditions.
Inspection and Preventative Maintenance
Regular inspection prevents small issues from becoming major problems. Before each significant ride, take a few minutes to:
1. Check all mounting hardware for tightness. Trail vibration can gradually loosen bolts and clamps.
2. Inspect rubber seals and gaskets for signs of deterioration or detachment. These components prevent water intrusion and eliminate rattles but can degrade over time from UV exposure.
3. Examine the windshield material for any cracks, chips, or scratches. Small damages can sometimes be repaired if caught early, preventing further deterioration.
4. Test any moving components on hinged or flip windshields to ensure smooth operation. A light application of silicone spray on hinges (avoiding the windshield surface) can maintain proper function.
For seasonal storage, consider removing the windshield completely and storing it flat in a temperature-controlled environment. This prevents stress on mounting points and protects the material from extreme temperature fluctuations that can cause warping.
Conclusion
Selecting the perfect Can-Am Maverick R front windshield is about balancing protection with the open-air experience that makes UTV riding so exhilarating. By understanding the different types, materials, and maintenance requirements, you can make an informed choice that enhances your adventures for years to come.
Consider your typical riding conditions and priorities when making your selection. If you frequently encounter harsh weather or ride in dusty environments, a full windshield might be ideal. For varied conditions, a vented or flip design offers valuable versatility. And when choosing between glass and polycarbonate, weigh the benefits of each against your specific needs and riding style.
Remember that proper installation and maintenance are just as important as selecting the right windshield. Take time to install your windshield correctly, check hardware regularly, and clean the surface appropriately for its material.
I encourage you to assess your current setup and consider how a quality windshield might enhance your riding experience. Whether you’re battling dust, deflecting debris, or simply wanting protection from the elements, the right windshield transforms your Can-Am Maverick R from an excellent machine into the perfect adventure companion.
Here’s to clear views and unforgettable trails ahead!