Introduction to Honda Pioneer Transmissions
The Honda Pioneer series represents a significant advancement in the Utility Task Vehicle (UTV) market, known for its durability and performance.
Among the various systems integrated into these vehicles, the transmission is a critical component that directly influences the overall functionality and efficiency of the UTV.
A high-performing transmission is essential for optimal power delivery, smooth gear changes, and ensuring that the vehicle can handle various terrains.
Honda has equipped different Pioneer models with distinct transmission systems, primarily focusing on two types:
the Continuously Variable Transmission (CVT) and the dual-clutch transmission (DCT).
The CVT offers a seamless experience by allowing the engine to operate at the most efficient RPM range while providing variable speed, making it suitable for diverse driving conditions.
Alternatively, the DCT system provides quicker gear shifts and increased power efficiency, appealing to those who seek a sportier driving experience.
Despite their robust design, these transmission systems are not immune to issues.
Common problems include slipping, unusual noises, and overheating, which can stem from wear and tear, improper maintenance, or even manufacturer defects.
These conditions not only hinder vehicle performance but can also lead to more significant issues if not addressed promptly.
Consequently, a transmission tear-down becomes an invaluable procedure to troubleshoot and rectify these problems.
This process allows technicians to inspect internal components, replace worn parts, and conduct thorough cleaning, ultimately ensuring the longevity and reliability of the Honda Pioneer UTV.
Preparing for a Transmission Tear-Down
Before embarking on a transmission tear-down of your Honda Pioneer, preparation is key to ensuring a smooth and efficient process.
The first step involves gathering all necessary tools.
Ensure you have a comprehensive toolset, including wrenches, screwdrivers, pliers, and specialty tools that may be required for transmission work.
Having these tools on hand will streamline the tear-down process and minimize frustration.
Next, familiarize yourself with the layout of the Honda Pioneer’s transmission.
Consult the service manual or online resources to gain a clear understanding of the components and their interconnections.
This knowledge is crucial for identifying each part during the disassembly process, helping to avoid errors that could complicate reassembly.
A good grasp of the transmission’s design will also aid in diagnosing any issues as you proceed.
Safety should always be a priority when performing mechanical work.
Before starting, ensure that you are wearing appropriate personal protective equipment (PPE), such as gloves and safety goggles.
Additionally, work in a well-ventilated area and consider placing safeguards to protect yourself from any hazardous materials, including old fluids that may drip from the transmission.
Make certain that the vehicle is securely positioned on a flat surface and that the wheels are chocked to prevent any unexpected movement.
As you begin the tear-down, documenting the disassembly process can prove invaluable.
Take photographs at various stages and create notes about the arrangement of components.
This method will aid significantly during reassembly, helping to ensure that each element is returned to its original position.
By following these steps and maintaining organization throughout, you can optimize the transmission tear-down for your Honda Pioneer, making the process more efficient and less prone to errors.
Step-by-Step Transmission Tear-Down Process
Embarking on the transmission tear-down process of a Honda Pioneer requires careful attention and methodical execution.
The initial step involves safely removing the transmission from the UTV.
Begin by ensuring that the vehicle is on level ground, and proceed to disconnect the battery to prevent any electrical mishaps.
Once secured, lift the rear of the vehicle using jack stands.
Detach the drive shafts, and remove any necessary surrounding components, including exhaust elements that may obstruct access.
Afterward, unbolt the transmission from the engine, ensuring all connectors and cables are disengaged.
This will yield the transmission as a standalone unit.
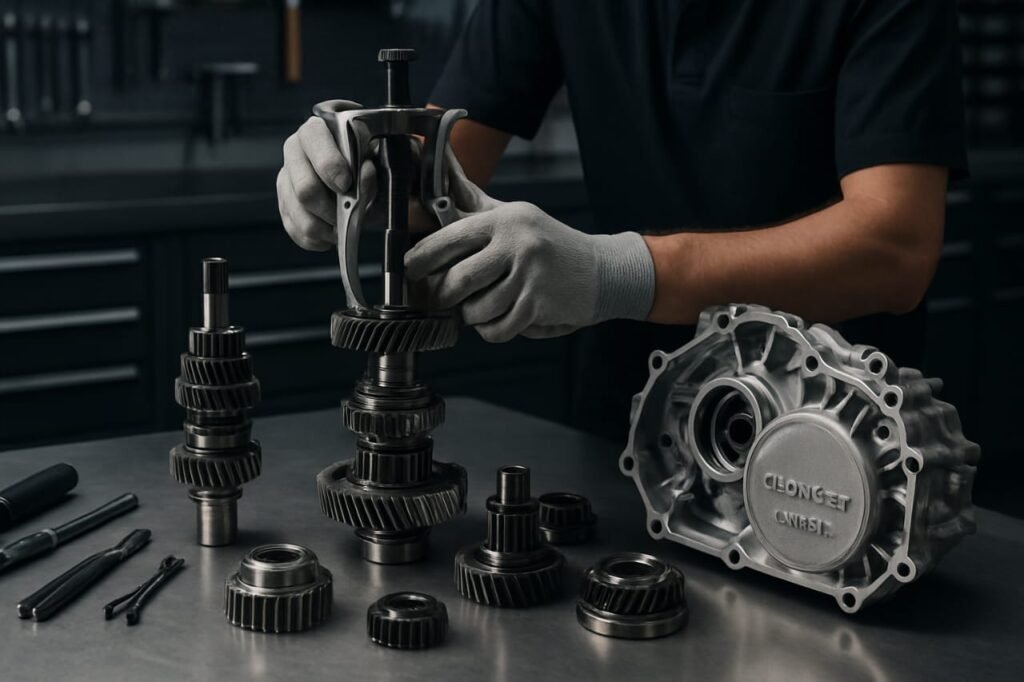
With the transmission separated from the UTV, the next stage is disassembling the casing.
Locate all necessary screws and bolts securing the outer casing and carefully remove them.
Utilize appropriate tools, such as a torque wrench, to avoid damaging the casing threads.
Once freed, gently pry open the casing, taking care not to disturb the internal components.
It is crucial to document the positioning of various parts, as this will assist in reassembly.
Laying out parts in the order they are removed can prevent confusion later.
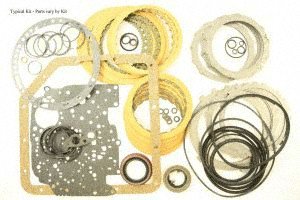
Inspection of the internal components is paramount during this phase.
Examine the gears, bearings, and seals for any signs of wear or damage.
Look for scoring, pitting, or unusual discoloration, which may signal underlying issues.
Common problems encountered during transmission tear-downs include fluid leaks and bearing failures.
Troubleshooting these problems can often be achieved through visual inspection, ensuring that each component meets the manufacturer’s specifications.
Additionally, reference any service guides or repair manuals specific to the Honda Pioneer, which can provide valuable insights throughout the process.
Caution and methodical practices are essential in ensuring a successful transmission tear-down and subsequent reassembly.
Reassembly and Best Practices
The reassembly of the Honda Pioneer transmission is a crucial phase following the tear-down process, requiring careful attention to detail to ensure all components function properly.
Begin by organizing all parts, using labeled bags or containers to keep track of smaller items, such as bolts and washers.
This practice helps prevent confusion and errors during the reassembly.
Before starting the reassembly, it is highly recommended to review the service manual thoroughly.
This resource provides specific diagrams and instructions that illustrate the proper placement and orientation of each component.
Pay particular attention to the sequence of assembly, as following the manufacturer’s guidelines is essential for optimal performance.
Ensure that all used gaskets are replaced, as a failure to do so can lead to leaks and performance issues.
One common mistake during the reassembly of the Honda Pioneer transmission is the incorrect placement of internal components.
To avoid this, always double-check that each part fits snugly and lines up correctly with surrounding components.
If a part does not align, re-evaluate its orientation before proceeding; applying excessive force can cause damage.
Once the transmission is reassembled, perform a thorough inspection of all components.
Check for any signs of wear or damage, particularly on the gears and bearings. Additionally, verify that all bolts are tightened to the specified torque values to prevent any issues during operation.
Lastly, consider performing a manual rotation of the transmission before reinstalling it into the UTV to ensure smooth operation.
This step can help identify potential issues early, allowing for adjustments to be made prior to installation.
Completing these reassembly practices with diligence will provide you with the confidence needed for a successful Honda Pioneer transmission tear-down and reassembly.
Doing so not only ensures reliability in performance but also extends the lifespan of your UTV.