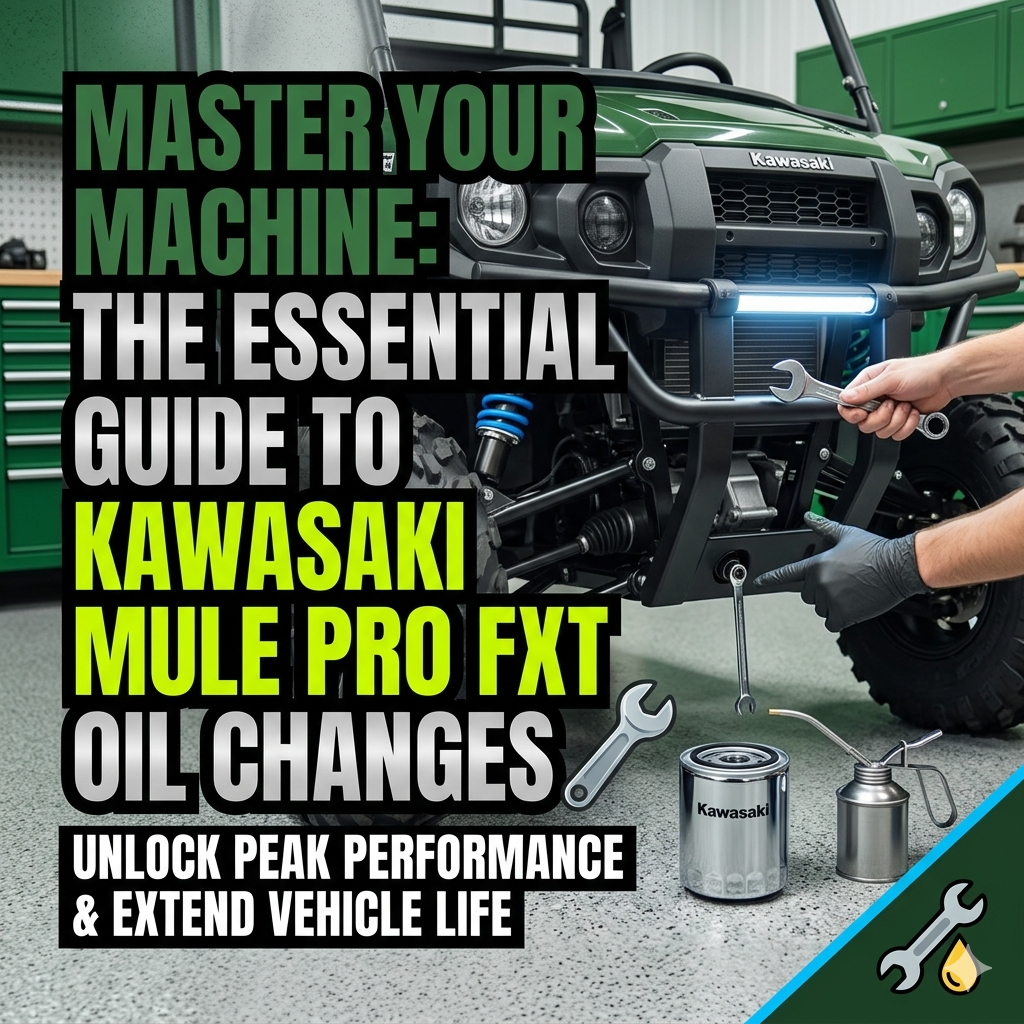

When it comes to kawasaki mule pro fxt oil change guide, getting the right details matters. Welcome, fellow off-road enthusiasts and diligent utility vehicle owners! 👋
Maintaining your rig is paramount to ensuring its longevity and performance, especially when tackling demanding tasks or rugged trails. Just like our beloved Honda Pioneers benefit from regular care, your Kawasaki Mule Pro FXT, a true workhorse, thrives on consistent, quality maintenance. One of the most critical aspects of this upkeep is the engine oil change. 🚜
This comprehensive guide is designed to empower you with the knowledge and confidence to perform a professional-grade oil change on your Kawasaki Mule Pro FXT. We’ll delve into the specifics, from understanding oil types to mastering torque settings, ensuring your machine is always ready for its next adventure or demanding job. 🌟
The Unseen Hero: Why Engine Oil Matters So Much
Think of your engine oil as the lifeblood of your Kawasaki Mule Pro FXT. It performs several vital functions: lubrication, cooling, cleaning, and protection against corrosion. Over time, engine oil breaks down, loses its viscosity, and accumulates contaminants from combustion and normal wear and tear. This degraded oil significantly reduces its protective capabilities, leading to increased friction, heat, and accelerated engine wear. 😔
For a utility vehicle like the Mule Pro FXT, which often operates under heavy loads, in dusty environments, or through extreme temperatures, the stress on engine oil is immense. A staggering 60% of engine wear occurs during startup, and clean, fresh oil is crucial for minimizing this impact. Statistics show that vehicles with consistent oil change schedules can see their engine lifespan extended by up to 30%. Prioritizing this routine maintenance means your Mule will continue to perform reliably, mile after mile, year after year. 💪
“Neglecting your oil change is like running a marathon without water; eventual breakdown is inevitable.”
When to Service Your Mule: Understanding Oil Change Intervals
Kawasaki recommends a predictable 50-hour cadence for oil changes to align with their engineering data and the practical realities of farm dust and trail mud. However, for brand-new machines, a crucial 20-hour service interval is often recommended to remove initial break-in contaminants. Always consult your owner’s manual for the most accurate and model-specific maintenance schedule. Ignoring these intervals can void your warranty and, more importantly, lead to costly engine damage. ⏰
It’s not just about hours; consider your operating conditions. If you’re frequently in very dusty conditions, deep mud, or performing heavy towing, you might consider more frequent oil changes. Regular checks of your dipstick for oil level and quality are also essential. If the oil appears dark, sludgy, or has a strong fuel smell, it’s time for a change, regardless of the hours. 🔍
Gathering Your Arsenal: Tools and Supplies
Before you begin, ensure you have all the necessary tools and supplies. Having everything at hand will make the process smooth and efficient. ✅
Here’s a comprehensive list:
- Fresh Engine Oil: Approximately 2.3 – 4 quarts (depending on model, check your manual). Kawasaki recommends KPO HP Semi-Synthetic 10W-40 ATV/UTV Oil, or a high-quality 10W-40. For winter, 5W-40 can be used. Many users also have success with Rotella T6.
- Genuine Kawasaki Oil Filter: Using an OEM filter is often recommended to maintain warranty and ensure proper fitment and filtration.
- New Drain Bolt Sealing Washer (Crush Washer): Essential for preventing leaks.
- 17 mm Socket and Torque Wrench: For the drain plug. Some models may require other sizes.
- Oil Filter Wrench: Essential for removing the old filter, and for ensuring correct torque on the new filter if not doing by hand-tight.
- Drain Pan: Large enough to hold the old oil.
- Funnel: To prevent spills when refilling.
- Nitrile Gloves and Rags/Shop Towels: For cleanliness.
- Shop Light/Inspection Mirror (Optional but Recommended): For better visibility.
- Safety Glasses: Always protect your eyes. 👁️🗨️
The Step-by-Step Kawasaki Mule Pro FXT Oil Change Guide
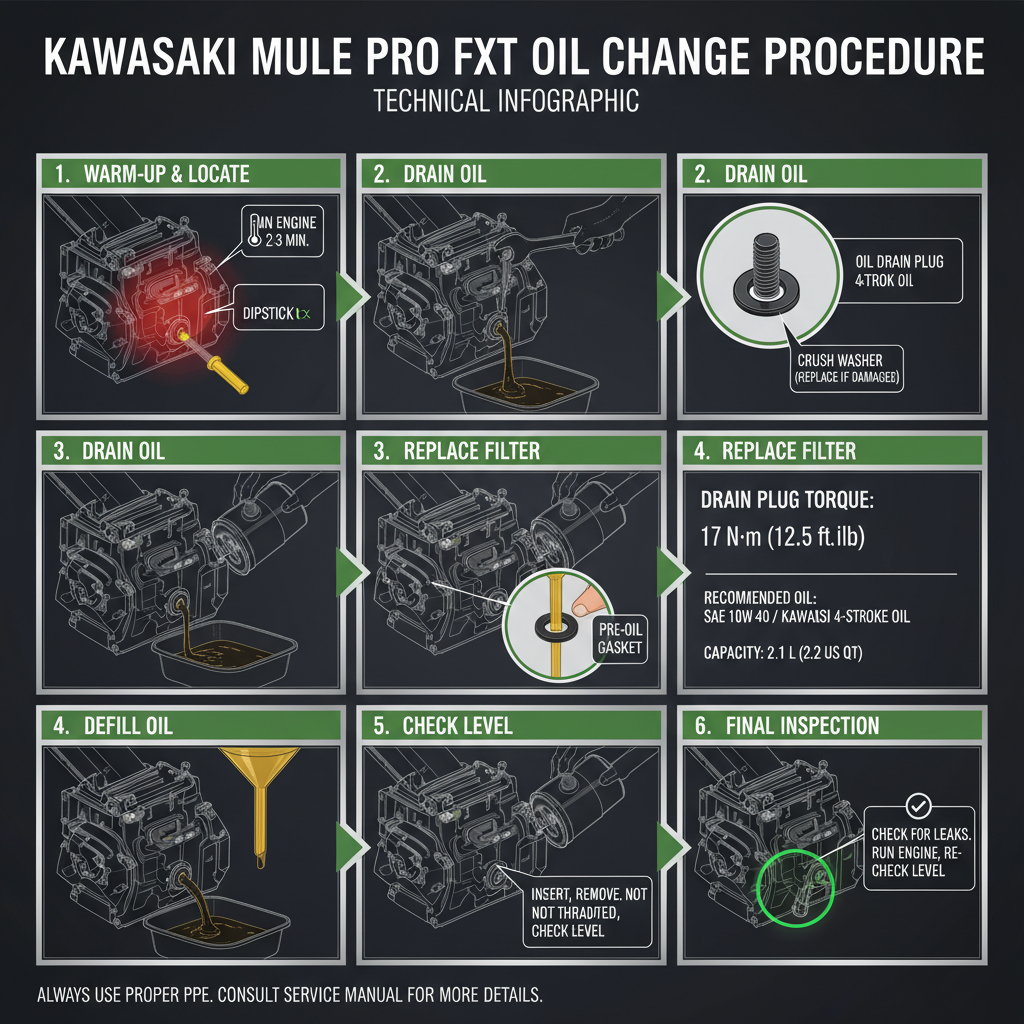
Follow these meticulous steps to ensure a flawless oil change for your Mule Pro FXT. These steps cover both the 820 and 1000 series, with notes for specific considerations. 🔧
1.
Warm-Up the Engine: Start your Mule and let it idle for about three minutes. This warms the oil, making it thinner and allowing it to drain more completely and quickly.
Check out our off-road collection Amazon products
2.
Access the Drain Plug and Filter: Park your Mule on a level surface. For many Mule Pro FXT models, you won’t need to remove the entire underbelly skid plate, but rather access a service door or locate the drain plug and filter from the side. On the passenger side, directly below the air filter, you’ll often find the 17mm drain plug.
https://www.youtube.com/watch?v=R9U0K8s2dOQ
3.
Drain the Old Oil: Place your drain pan directly beneath the oil drain plug. Using your 17 mm socket, carefully remove the drain bolt. Allow all the old oil (approximately 2.3 to 4 quarts, depending on your model) to drain completely into the pan. This usually takes 10-15 minutes. Inspect the crush washer on the drain bolt; if it looks flattened or damaged, replace it.
4.
Replace the Drain Plug: Once the oil has fully drained, reinstall the drain plug with a new crush washer. Torque the drain plug to the manufacturer’s specification. This is a critical step to prevent leaks and avoid damaging the aluminum oil pan.
5.
Remove the Old Oil Filter: Locate the oil filter. For the FXT models, especially the crew-cab versions, filter clearance might be tighter due to driveshaft angles. Some guides recommend loosening the hydraulic-line bracket for extra room. Use your oil filter wrench to spin off the old filter. Be prepared for a small amount of oil to spill.
https://www.youtube.com/watch?v=OtrjI4Ue2o0
6.
Prepare and Install the New Oil Filter: Apply a thin film of fresh engine oil to the rubber gasket of the new oil filter. This ensures a good seal and makes future removal easier. Spin on the new filter by hand until it’s snug, then tighten it an additional ¾ to 1 full turn with your hand or an oil filter wrench. The torque spec for the oil filter is usually much lower than the drain plug.
7.
Refill with Fresh Oil: Locate the oil fill cap, typically near the dipstick. Using a clean funnel, carefully pour in the recommended amount of fresh engine oil (e.g., 2.3 liters for the 820 series, or around 4 quarts for the 1000 series). Start with slightly less than the total capacity and check frequently.
8.
Check Oil Level: Insert the dipstick without threading it in (if specified by your manual) and then remove it to check the oil level. It should sit at the “HIGH” mark. Add small amounts of oil as needed until the correct level is achieved.
9.
Leak Check and Final Top-Off: Start the engine and let it idle for about 30 seconds. This allows the new oil to circulate and fill the filter. Shut off the engine, wait a minute, and then re-check the oil level on the dipstick. Inspect the drain plug and oil filter base for any leaks. Top off the oil if necessary.
10.
Clean-Up and Disposal: Wipe away any spills. Properly dispose of the used oil and old filter at an authorized recycling center. Never dump used oil! ♻️
Crucial Torque Specifications for Your Mule Pro FXT
Applying the correct torque is essential for preventing stripped threads and ensuring components are securely fastened. Here’s a quick reference table: 📌
| Component | Kawasaki Mule Pro FX/FXT 820 (Approx.) | Kawasaki Mule Pro FX/FXT 1000 (Approx.) | Unit Conversion (Approx.) |
|---|---|---|---|
| Engine Oil Drain Plug | 25 N·m | 25.3 ft-lbs | (25 N·m ≈ 18.4 ft-lbs) |
| Engine Oil Filter | Hand-tight + ¾ turn | 13 ft-lbs (or 89 in-lbs) | (13 ft-lbs ≈ 17.6 N·m) |
Always double-check your specific model’s service manual for the exact torque specifications, as these can vary slightly by year and engine size. 📖
https://www.youtube.com/watch?v=F3aJ2l3D4cI
Expert Tips for a Seamless Oil Change Experience
Beyond the basic steps, these pro tips can elevate your oil change game and ensure maximum protection for your Kawasaki Mule Pro FXT. 💡
Check out our off-road collection Amazon products
1.
Always use genuine Kawasaki oil filters. Aftermarket filters may not meet the exact specifications, potentially compromising filtration and even voiding your warranty.
2. Consider the environment. If you operate your Mule in extremely dusty or wet conditions, consider reducing your oil change intervals. Dust is a notorious enemy of engine health. 🏜️
3.
Keep a maintenance log. Document the date, hours, and type of oil and filter used. This helps you track your maintenance schedule and provides a valuable record for resale or troubleshooting.
4. When checking the oil level, ensure the machine is on a level surface and the engine has been off for a few minutes to allow oil to settle in the sump. This gives you the most accurate reading. 📏
“A well-maintained machine is a happy machine, and a happy machine never leaves you stranded.”
5.
Regularly inspect other fluids and components during your oil change. This includes checking coolant levels, brake fluid, and the air filter. A quick visual inspection can prevent larger issues down the line.
6. For those with the Kawasaki Mule Pro FXT 1000, remember that while the engine shares characteristics with the Teryx 1000, it’s detuned for utility, emphasizing reliability and torque over raw horsepower. Your oil change protocol should prioritize these workhorse characteristics. 💪
Beyond the Oil: Holistic UTV Maintenance
While the oil change is a cornerstone of maintenance, a truly robust UTV care regimen encompasses other vital checks. Regular inspection of your tires for proper pressure and wear, checking drive belts for glazing or cracks, and ensuring your cooling system is clear of debris are all part of keeping your Mule in top condition. These holistic checks, especially important for the 2026 models with their refined powertrains, guarantee peak performance. A well-rounded maintenance approach helps you avoid unexpected breakdowns and maximizes your time on the trails or at the worksite. 🛠️
As enthusiasts, we understand the thrill of pushing our machines to their limits, whether that’s hauling heavy loads or navigating challenging terrain. This pursuit of adventure and productivity is only truly enjoyable when you have full confidence in your vehicle’s reliability. By diligently performing your Kawasaki Mule Pro FXT oil changes and other scheduled maintenance, you’re not just turning wrenches; you’re investing in countless hours of dependable service and exhilarating rides. 🎉
So, roll up your sleeves, gather your tools, and give your Kawasaki Mule Pro FXT the essential care it deserves. Your machine will thank you with years of unwavering performance! Happy trails! 🏞️
🔍 Explore More: See all Wild Testing guides for kawasaki mule pro fxt oil change guide.
Check out our off-road collection Amazon products
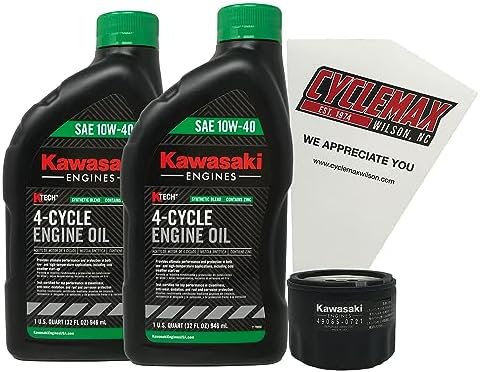
- Two Quarts of Kawasaki 10W-40 99969-6296 Motor Oil
- One Kawasaki 49065-0736 Oil Filter (replaces/supersedes 49065-0721 & 49065-7007)
- Convenient Disposable Funnel
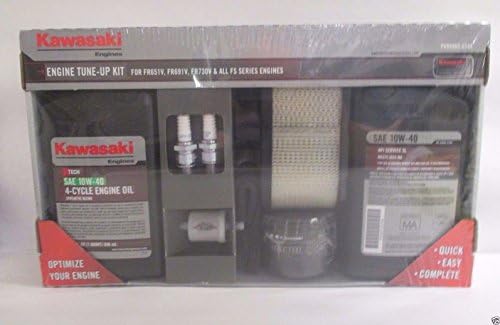
- Brand New Genuine Kawasaki Engine Tune Up Kit… We are an Authorized Kawasaki Dealer… Engine Tune Up Kit Genuine Kawa…

- Replace part number: OEM for 49065-0724、49065-7010、KM-49065-0724、KM-49065-7010、49065-2071、49065-2057、KM-49065-2071、KM-49…
- Compatible with: 49065-0724 Oil Filter Replaces 49065-7010 Compatible with the Following Machines: Kawasaki FH381V, FH43…
- Compatible with: For FC150V,FC401V,FC420V,FB460V-HS04 JS05 ES07, FC540V GS03 HS03 4 Stroke Engine; for Robin EH18V EH64 …