


WELCOME 🔥
When it comes to diy utv roof rack plans, getting the right details matters. For Honda Pioneer enthusiasts, the quest for more storage is never-ending, especially when preparing for long weekend expeditions or hunting trips. While factory options are available, they often come with a premium price tag that can eat into your budget for other important modifications. Building your own custom solution using solid diy utv roof rack plans is not just about saving money; it is about creating a system that perfectly matches your specific off-road needs. In 2025, we are seeing a massive shift toward modular designs that allow riders to swap out accessories like gun boots, fuel packs, and rooftop tents in minutes.
Why Build Instead of Buy?
The primary motivation for most DIYers is cost efficiency, but the benefits go far beyond the wallet. Commercial racks are often “one size fits all,” which means they might not accommodate your specific light bar or low-profile garage clearance requirements. By designing your own rack, you can ensure it sits as low as possible to the roll cage, reducing the center of gravity and minimizing the risk of tipping on off-camber trails. Custom builds allow you to integrate specific mounting points for your favorite gear, such as high-lift jacks or RotopaX fuel containers, without needing expensive adapters.
https://www.youtube.com/watch?v=Rm4YRNfRrmh
Furthermore, the satisfaction of fabricating a crucial part of your rig is unmatched in the off-road community. When you are miles from civilization and a bolt rattles loose, knowing exactly how your rack was put together means you can fix it on the trail with confidence. Recent forum discussions highlight that over 60% of Pioneer owners prefer modular setups that can be easily removed when not in use.
Choosing the Right Materials: Steel vs. Aluminum
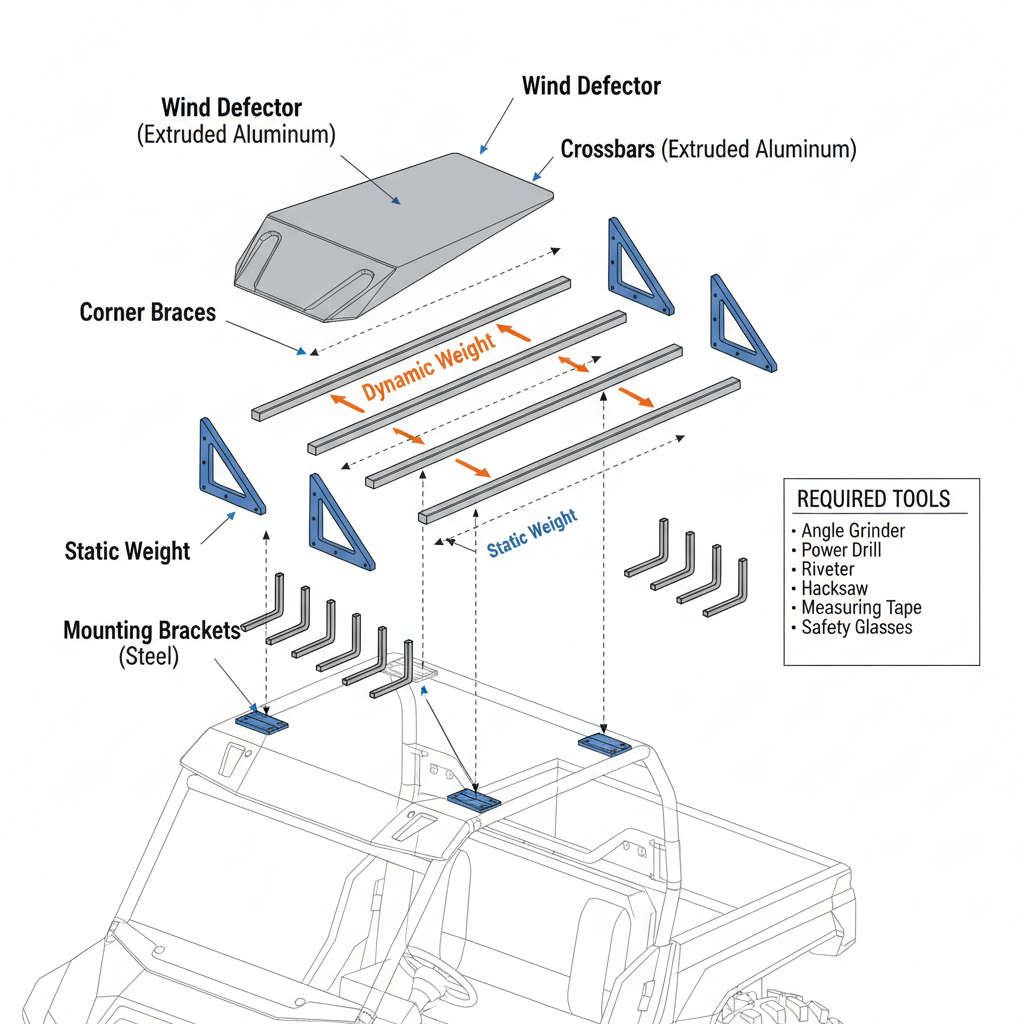
Selecting the right material is the most critical decision in your project, as it dictates the weight, strength, and longevity of your rack. Traditional steel tubing is incredibly strong and easy to weld if you have the equipment, but it is heavy and prone to rust if not properly powder-coated. For modern DIY builds, 80/20 extruded aluminum (T-slot framing) has become the gold standard because it is lightweight, requires no welding, and offers infinite adjustability.
Check out our off-road collection Amazon products
Another popular and budget-friendly option is Unistrut (or Superstrut), commonly found in the electrical aisle of big-box hardware stores. While heavier than aluminum, galvanized steel Unistrut is incredibly robust and allows for bolt-together construction using simple hand tools. It is an excellent choice for those who want a “utilitarian” look and extreme durability without the high cost of specialized aluminum profiles.
| Material | Pros | Cons | Est. Cost (4×4 Rack) |
|---|---|---|---|
| Extruded Aluminum (80/20) | Lightweight, Modular, No Rust | Expensive, Specialty Fasteners | $300 – $500 |
| Unistrut (Steel Channel) | Very Strong, Cheap, Available Locally | Heavy, Industrial Look | $100 – $150 |
| Welded Steel Tubing | Cleanest Look, High Strength | Requires Welding Skills, Rust Risk | $150 – $250 |
Essential Tools and Preparation
Before cutting a single piece of metal, you need to gather the right tools to ensure a professional finish. If you are working with Unistrut or aluminum extrusion, a miter saw with a non-ferrous metal blade will give you clean, square cuts that are essential for a square frame. A quality deburring tool is also mandatory to remove sharp edges that could slice your cargo straps or scratch your roll cage during installation.
- Measuring Tape & Square: Precision is key; “measure twice, cut once” is the rule to live by.
- Drill & Cobalt Bits: Hardened steel bits are necessary for drilling through roll cage clamps or steel brackets.
- Socket Set & Wrenches: Ensure you have the correct metric sizes for Honda’s hardware (usually 10mm, 12mm, and 14mm).
- Threadlocker (Blue): Vibration from the trail will loosen bolts over time; threadlocker is non-negotiable safety equipment.
https://www.youtube.com/watch?v=Ey6EvfpKdJK
Step-by-Step Construction Guide
The first step in your build is to determine the mounting points on your Honda Pioneer’s roll cage. Most builders use wrap-around tube clamps (1.75″ diameter for most Pioneer models, but verify your specific year) to create a base foundation without drilling into the factory safety cage. Once these clamps are secure, you can bolt your longitudinal rails directly to them, ensuring they are perfectly parallel to reduce wind noise.
Next, install your crossbars at even intervals, spacing them according to the gear you plan to carry. For a rooftop tent, you will need more frequent crossbars to support the static weight of the occupants. If you are using Unistrut, make sure to orient the open channel downwards or sideways to prevent water and mud from pooling inside the rails and causing corrosion.
“The difference between a good rack and a great rack is in the details—add tie-down points everywhere, even where you think you don’t need them.”
Finally, consider aerodynamics by adding a wind deflector to the front of your rack. A simple piece of plexiglass or aluminum sheet angled at 45 degrees can significantly reduce the “whistling” noise that plagues many home-built racks at speeds over 30 mph. This also helps deflect low-hanging branches away from your cargo.
Check out our off-road collection Amazon products
https://www.youtube.com/watch?v=HaWiuPZvyRR
Safety and Load Limits
It is vital to respect the center of gravity of your UTV. Honda Pioneers are stable machines, but adding 200 lbs of gear to the roof significantly raises the tipping point. Always keep heavy items like fuel and water as low as possible, preferably in the bed, and reserve the roof rack for bulky but lightweight items like sleeping bags, tents, or empty traction boards.
According to 2024 safety data, overloading roof racks is a leading cause of rollover incidents in side-by-sides. A good rule of thumb is to limit your dynamic roof load (weight while moving) to under 100 lbs for aggressive trail riding. Static load (weight when parked, like a tent with people) can be higher, often up to 500 lbs depending on your cage’s integrity.
For more details on vehicle specifications, you can visit the official Honda Powersports website. Additionally, forums like HondaSXS and PRC Forum are treasure troves of community knowledge. For material sourcing, 80/20 Inc. provides excellent catalogs for aluminum profiles, and McMaster-Carr is the go-to for high-grade hardware.
“Build it strong, keep it light, and never compromise on the quality of your mounting hardware.”
By following these guidelines and utilizing robust diy utv roof rack plans, you can transform your Honda Pioneer into the ultimate expedition vehicle. Whether you choose the sleek modularity of aluminum or the rugged strength of Unistrut, the result will be a custom setup that commands respect on the trail.
🔍 Explore More: See all Wild Testing guides for diy utv roof rack plans.
Check out our off-road collection Amazon products

- 【Wide Application】: The mini bar clamp can be used to install horizontal tubes with diameters of 0.75″, 1″, 1.25″ for mo…
- 【High Compatibility】: This off-road light bar bracket comes with a tube clamp with a 10mm screw hole and is suitable for…
- 【Anti-Slip Protection】: The anti-slip teeth on the inner side securely grip the mount, preventing damage to your lights …
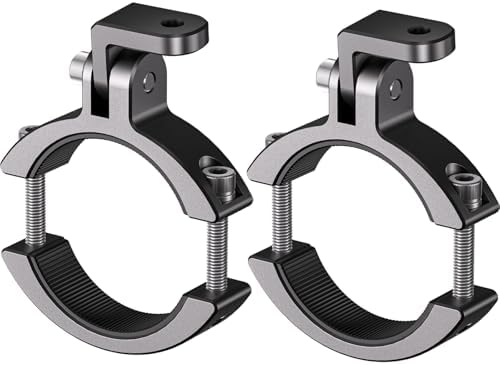
- Wide Compatibility: These light bar mounts are specifically designed for 1.85″-3″ pipe diameters, it easily mounts to th…
- Sturdy & Durable Construction: Crafted from high-strength 6061-T6 aluminum alloy using precision CNC machining, these li…
- Secure & Damage-Free Mounting: The clamp mounts feature built-in anti-slip rubber teeth that ensure a tight fit against …

- The light mounts made of 6061-T6 aluminum alloy material with CNC machining and iii grade hard anodized surface for dura…
- Fit for round rails 0.875″(22mm), 1″(25.4mm), 1.125″(28.6mm), 1.26″(32mm), 1.375″(34.92mm) in diameter, for ATV, Quad AT…
- The light bar mounts with 10mm diameter screw mounting hole. Ideal for a variety of applications including light bars, L…