
- Technical Specification: Operating voltage: DC 12-24V, max current: 60A, rated voltage: 12V 20A / 24V 10A; operating at …
- Automatic Dimmable Function: Newest 8 gang switch panel have automatic dimmable feature, the backlight brightness of the…
- Safety Protection: Our this 8 gang switch panel is built-in solid state relay, not the external relay, provide over-volt…

- AUXBEAM 6 GANG SWITCH PANEL: Offers a perfect solution to clean up all wiring harness and add a single panel to control …
- AUTOMATIC DIMMABLE SYSTEM: Auxbeam 6 gang switch panel has automatic dimmable feature. When in a tunnel or dark place, t…
- EASY INSTALLATION & SAFETY DESIGN: Keeps various wires organized and dry within a compact control box. Comes with wear-r…

- SPECIFICATIONS: Maximum current 40A, voltage input DC 12-24V, power range 480W~960W, operating temperature range -40~221…
- AUTOMATIVE LIGHT CONTROL EXPERT: The 4 gang switch panel helps you better connect your car lights. Simplify the wiring p…
- MULTI-FUNCTION: The truck switch panel has various functions: automatic dimming, one-touch backlight off, RGB backlight …
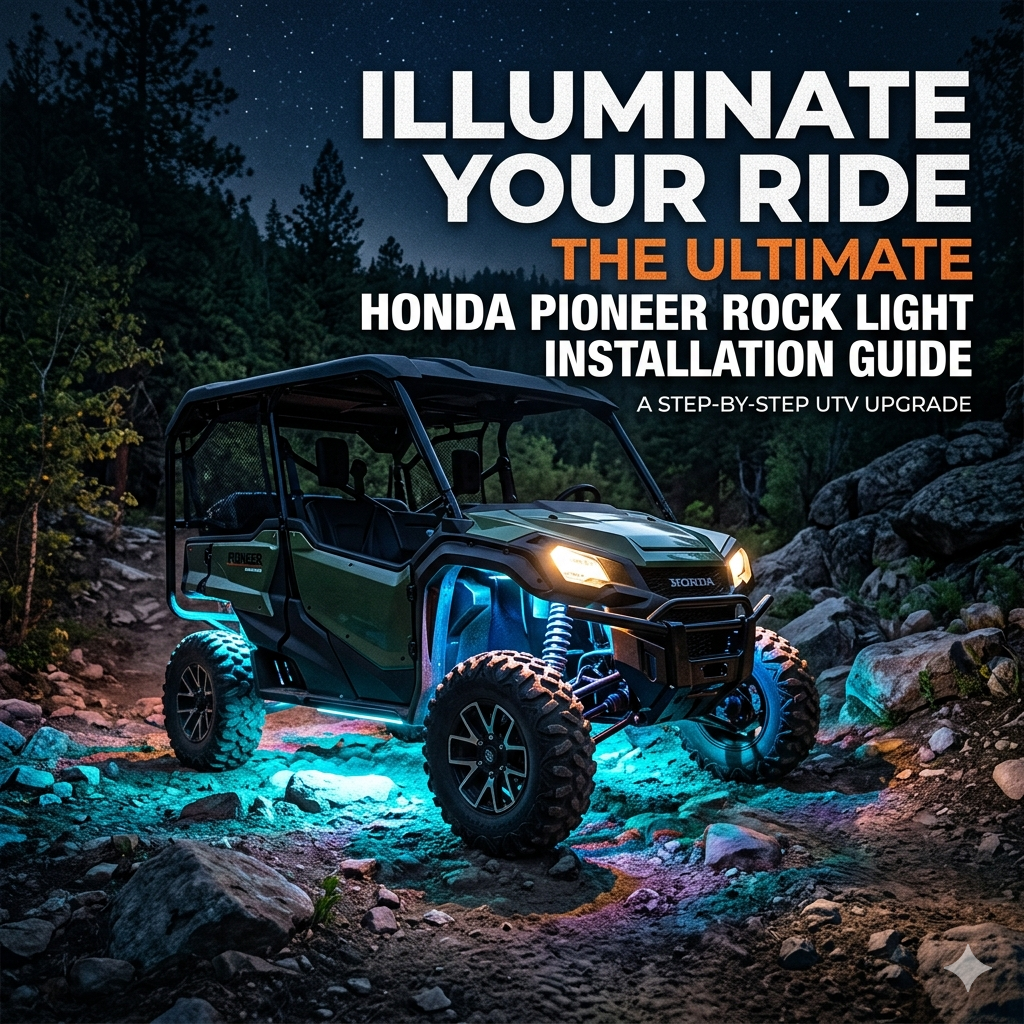
Welcome, fellow Honda Pioneer enthusiasts, to the ultimate guide for one of the most transformative upgrades you can make to your rig: installing rock lights!
This isn’t just about adding a “wow” factor—though the visual appeal is undeniable. Rock lights are a crucial tool for any serious off-roader, providing essential ground illumination that your headlights and light bars simply can’t match.
Properly installed rock lights help you navigate treacherous terrain in low-light conditions, allowing you to see obstacles like rocks, ruts, and logs right under your wheels.
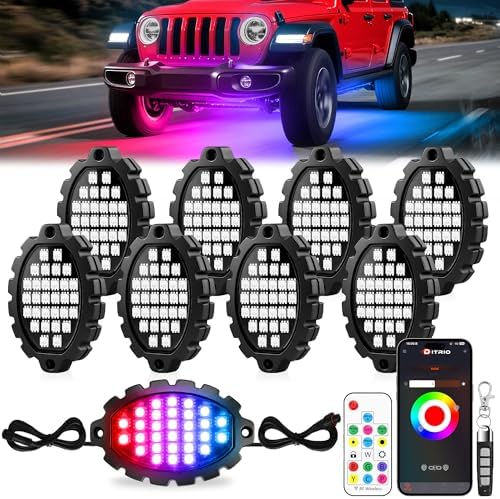
Modern LED technology has made these kits more durable and efficient than ever. Recent data for 2026 shows a 40% increase in the adoption of RGB and RGBW (Red, Green, Blue, White) LED systems in UTVs, prized for their longevity and low power consumption.
Say goodbye to guessing where your tires are going and hello to confident, precise wheel placement on your next night ride. 🤘
Beyond the practical benefits, they offer an incredible level of personalization, transforming your Pioneer into a head-turning machine at any meet-up or trail event.
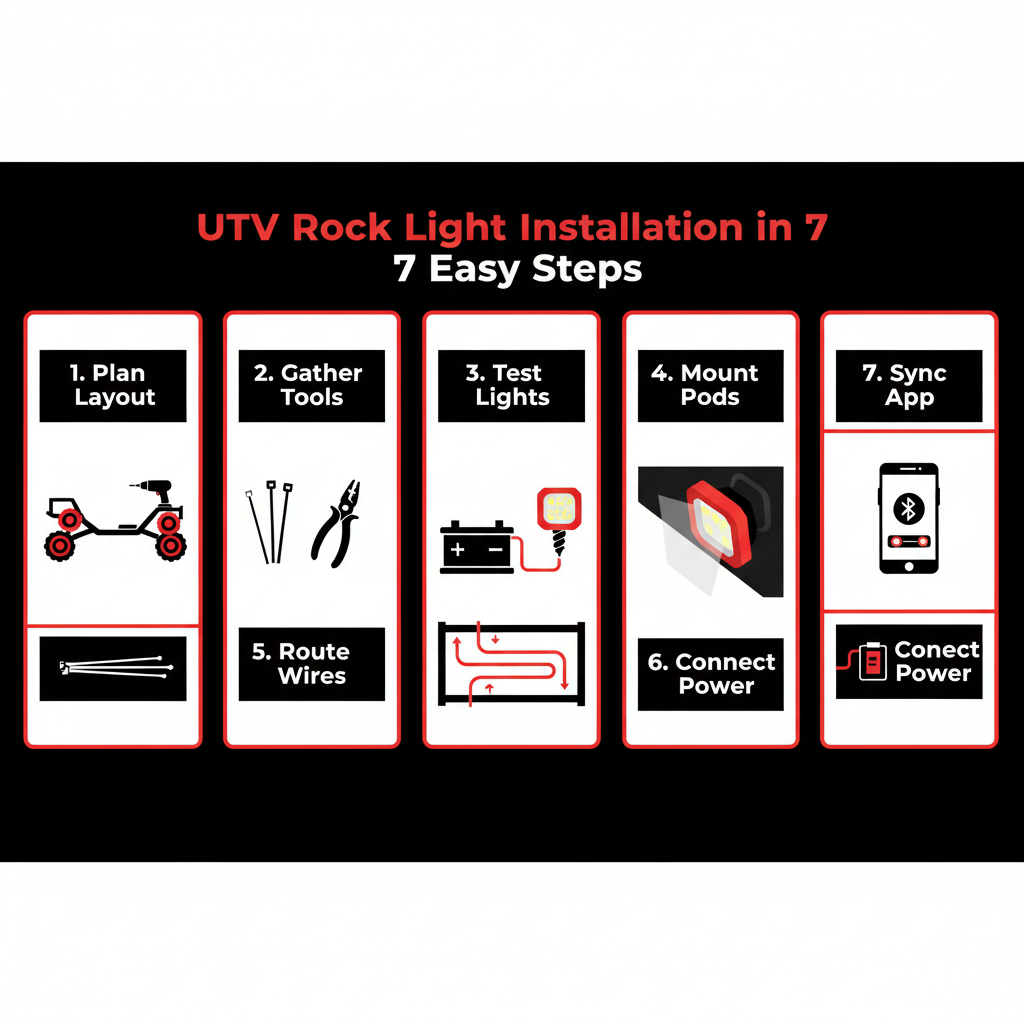
🛠️ Planning & Preparation: The Blueprint for Success 🛠️
Before you even touch a wire, a solid plan is your best friend. A little forethought now will save you hours of frustration later. A successful installation is all about strategic placement and clean wiring.
The most common and effective setup involves placing one light in each of the four wheel wells. This provides a fantastic spread of light that covers your entire undercarriage and the immediate path of your tires.
Check out our off-road collection Amazon products
For even more comprehensive coverage, especially on four-seater models, consider an eight-pod kit. You can place an extra light in front of the front tires and another behind the rear tires for total 360-degree visibility.
Walk around your Pioneer and identify solid mounting points. The frame rails are typically the best option. Make sure your chosen locations are clear of any moving suspension parts, exhaust components, or steering linkages.
“Measure twice, drill once. A clean install is a reliable install.”
Once you have your locations mapped out, lay the wiring harness alongside the vehicle to ensure all the leads will reach their designated pods and the central control box. If you have a longer machine, you may need extensions—many kits include them.
🔧 The Installation: Let’s Get Our Hands Dirty 🔧
With our plan in place, it’s time to bring this project to life! First things first: safety. Disconnect the negative terminal of your Pioneer’s battery to prevent any electrical mishaps.
Crucial Pro-Tip: Before you mount a single pod, test every light! Connect each one to the control box and temporarily hook it up to a 12V source to ensure they all function correctly. There’s nothing worse than finishing an install to find a dead light.
| Step | Action Required | Key Considerations |
|---|---|---|
| 1. Mount the Pods | Securely attach each rock light pod to your pre-planned locations using the supplied hardware. | Use the rubber mounting pads to reduce vibration. Drill pilot holes if necessary. |
| 2. Route Wiring | Run the wires from each pod towards your control box location, securing them along the frame. | Use plenty of zip ties and avoid hot surfaces (exhaust) or sharp edges. |
| 3. Install Control Box | Mount the control box in a central, protected location, like under the dash or in the glove box. | Keep it away from excessive moisture and heat for optimal performance. |
| 4. Connect to Power | Connect the main power and ground wires from the control box. | Connect directly to the battery, an accessory bus bar, or a fuse tap for a clean setup. |
https://youtube.com/watch?v=WlPj7m2LGN4
When routing wires, tuck them high and tight along the frame rails. Following the path of existing factory wiring is often the safest bet. The goal is to make your wiring look like it came from the Honda factory—neat, secure, and out of harm’s way.
A popular method is to use a daisy-chain configuration, where wires connect from one light to the next, minimizing the amount of wiring you need to run back to the controller.
⚡ Powering Up & Final Touches ⚡
How you connect to power is a critical step. While you can connect directly to the battery, a more professional approach is to use your Pioneer’s accessory bus bar or an add-on switch panel. This ensures the lights are only powered when the ignition is on, preventing accidental battery drain.
Here are your primary power connection options:
Check out our off-road collection Amazon products
- Direct to Battery: The simplest method, but carries the risk of draining the battery if left on. Always install an inline fuse.
- Accessory Power / Bus Bar: The preferred method. This ties the lights to your UTV’s ignition system. Your Pioneer likely has a pre-wired accessory terminal block for this purpose.
- Fuse Tap: This technique allows you to draw power from an existing circuit in your fuse box, another clean way to integrate with the ignition.
https://youtube.com/watch?v=xksn_yM5A7M
Once everything is connected, reconnect your battery’s negative terminal. Power on your machine and test the lights! Most modern kits are controlled via a smartphone app over Bluetooth. Download the corresponding app, pair it with your controller, and start exploring the features. 🌈
Take your time to neatly bundle any excess wiring with zip ties for a professional finish that will withstand the rigors of the trail.
You can now cycle through colors, adjust brightness, and set dynamic modes like strobe or fade. Some advanced kits even allow you to sync the lights to music or integrate with your turn signals and brake lights!
https://youtube.com/watch?v=4I-p_I9X5mY
🚀 Ride with Confidence & Style 🚀
Congratulations! You’ve successfully completed one of the most rewarding and functional upgrades for your Honda Pioneer. You’ve not only boosted its off-road capability but also added a serious dose of custom style.
Now, it’s time to hit the trails and show off your work. Enjoy the enhanced visibility, the head-turning colors, and the confidence that comes with knowing exactly what lies beneath your tires. For more DIY guides and Honda Pioneer tips, be sure to check out our other articles!
“Light up the night and own the trail. Adventure awaits.”
For more detailed specifications on wiring and accessories, you can always refer to the official Honda Powersports website. Happy riding! 🤠
🔍 Explore More: See all Wild Testing guides for rock lights installation guide utv.
Check out our off-road collection Amazon products

- 【Multicolor & Music Sync Modes】The underglow lights for trucks Built in 16 million colors and scene modes, and it can di…
- 【High Quality & Lifespan】This car RGB LED rock lights use advanced 5054 chip, solid metal housing, shockproof, dustproof…
- 【Easy to Use】 You can control the Led strip lights via APP. Easily select colors, change modes, adjust brightness & timi…
- 【Metal Aluminum Housing】Made with die-cast aluminum housing,these metall rock lights boast multiple strengths—superior h…
- 【Powerful Brightness】Unique exterior design of the rock lights trucks ensures that every corner can be covered by light,…
- 【Trendy Chasing Mode & Safe Brake Signal】With 16 million color choices and a ‘chase’ color mode. Control them through DI…

- 【Dual-Side Lighting + 213° Ultra-Wide Beam】Unlike ordinary single-side rock lights that create dark spots and uneven sha…
- 【Smart Brake Light Mode + 6000K Utility White】Safety Meets Style,with Auxbeam lights,switch between 16 million vibrant R…
- 【Dual Control (APP + Remote) + 180+ Dynamic Modes】Full Control,Your Way,Bluetooth APP + RF Remote Included. Tired of app…