Hey there, fellow Honda Pioneer enthusiasts! 👋 Are you tired of your epic off-road adventures ending with a UTV caked in mud, rocks flung everywhere, and your passengers resembling a muddy yeti? 😩
We get it. The thrill of the trail is unmatched, but the aftermath of a muddy excursion can be a real headache. That’s where a good set of mud flaps comes into play! 🛡️
But why buy when you can build? A DIY approach not only saves you some hard-earned cash but also allows for custom solutions tailored precisely to your Honda Pioneer’s needs and your riding style. 🛠️
In this comprehensive guide, updated with the latest insights for 2024-2026 models, we’ll dive deep into crafting your own UTV mud flaps. We’ll explore materials, tools, step-by-step instructions, and even touch upon the ongoing debate between mud flaps and fender flares. Let’s get that Pioneer ready to dominate the dirt, not just collect it! 🚀
Why Mud Flaps Are a Trail Essential in 2024 and Beyond 🏞️
The Honda Pioneer is a beast, built for utility and adventure. However, its stock fenders often fall short when truly pushed to the limits of muddy trails or gravel roads. This isn’t just about aesthetics; it’s about protection, longevity, and even safety! 💯
Effective mud flaps significantly reduce the amount of mud, rocks, and debris thrown up by your tires, keeping your UTV’s body, suspension components, and even your passengers cleaner and safer. [cite:3_3, 3_5]
Imagine less time scrubbing hardened mud from hard-to-reach places and more time planning your next epic ride. That’s the dream, right? 🤩
Beyond cleanliness, mud flaps protect your UTV’s paint and vulnerable mechanical parts from costly chips and damage caused by flying debris. This is especially true for models like the Honda Pioneer 1000-5 (2016-2025) where extended rear fender flares are a “must-have” for serious off-roaders. [cite:0_2]
For those running oversized tires, some regions even have legal requirements for adequate mud protection, making mud flaps or fender flares a necessity. [cite:3_2]
https://www.youtube.com/watch?v=R94yF0o6VqY
DIY vs. Aftermarket: The Great Debate ⚖️
While many excellent aftermarket solutions exist, such as the MudBusters Honda Pioneer Fender Flares which are available for models up to 2026, the DIY route offers unique advantages. [cite:0_1]
Pre-made options like SAUTVS Extended Rear Fender Flares for the Honda Pioneer 1000-5 (2016-2025) are made from durable injection-molded polypropylene and offer great coverage. [cite:0_2]
However, opting for DIY gives you unparalleled control over the design, size, and even the material thickness. It’s about personalizing your Pioneer for *your* specific adventures. 🌟
A HONDASXS forum discussion from late 2024 highlighted the community’s ongoing quest for effective mud/cow poop protection for models like the 1000-6, with some noting that even popular brands like MudBusters might not have a perfect fit for every variant. [cite:1_4, 1_5]
This is where your DIY creativity shines! You can craft a solution that fits your exact Honda Pioneer model, whether it’s a 2024 Pioneer 700 or a 2026 Pioneer 1000-5.
The cost savings can be significant too! Some enthusiasts have successfully created minimalist mud flaps for under $50, demonstrating that effective protection doesn’t have to break the bank. [cite:0_5]
Choosing Your DIY Mud Flap Material 🧵
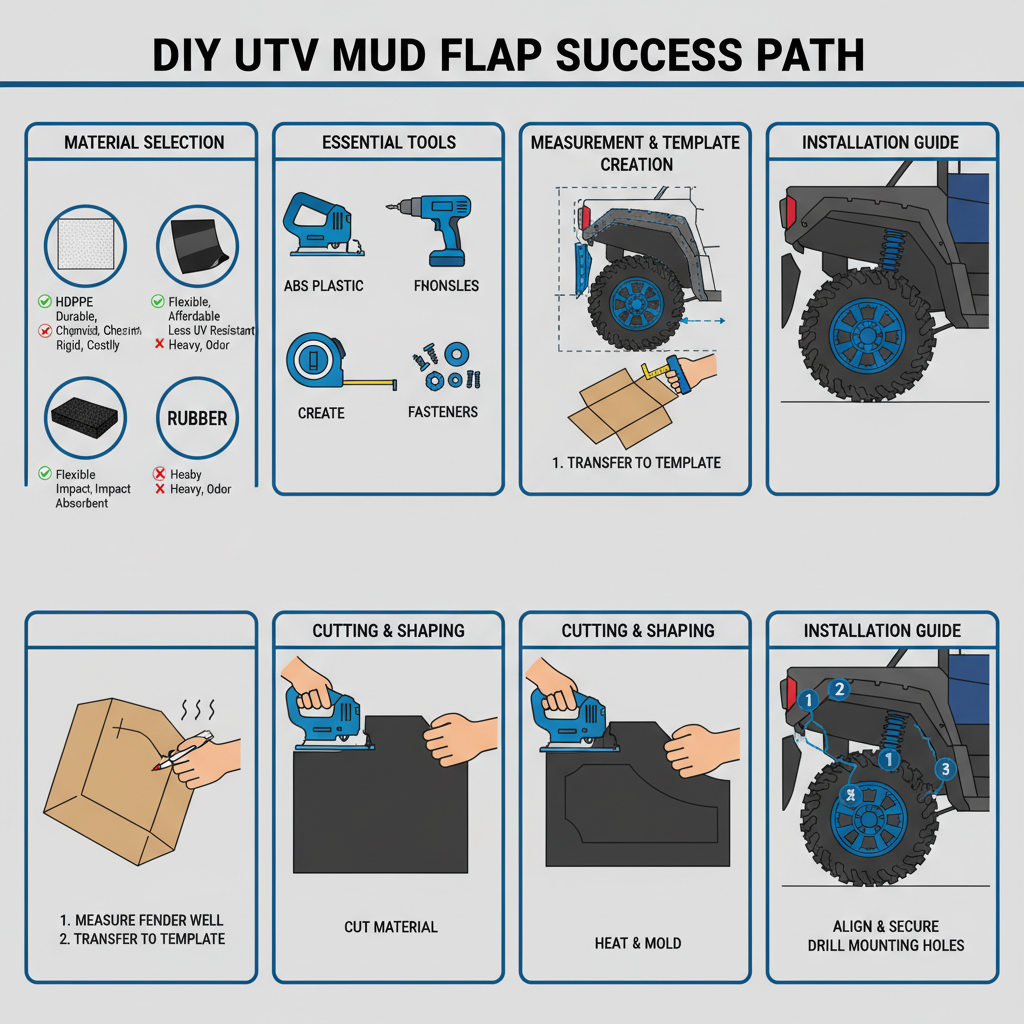
The foundation of a great DIY mud flap is the right material. You need something durable, flexible, and resistant to the harsh elements of off-road life. 🌬️
Here are the top contenders:
- High-Density Polyethylene (HDPE): This is a fantastic choice, known for its impact resistance, flexibility, and durability in various weather conditions. [cite:0_5, 2_2, 2_4] It’s also relatively easy to work with.
- ABS Plastic: Another excellent option, especially for fender flare extensions. It’s impact-resistant, friction-resistant, and can be easily molded with a heat gun. [cite:2_1, 3_4]
- Heavy-Duty Rubber or Conveyor Belt Material: For a more traditional, flexible mud flap, salvaged conveyor belt material or thick rubber sheets are excellent. They offer superb impact absorption.
When selecting your material, consider its thickness; generally, 1/8th inch (3mm) to 1/4 inch (6mm) is a good range for balancing flexibility and protection.
Tools You’ll Need for the Job 🧰
Before you get started, gather your arsenal of tools. Having everything at hand will make the process much smoother. 🛠️
| Tool | Purpose | Notes |
|---|---|---|
| Measuring Tape/Ruler | Accurate measurements for custom fit. | Essential for precise cuts. |
| Marker/Grease Pencil | Transferring template to material. | Permanent or washable, as preferred. |
| Jigsaw or Utility Knife | Cutting your chosen material. | A table saw offers cleaner cuts for HDPE. [cite:0_5] |
| Drill and Drill Bits | Creating mounting holes. | 5/16″ bit for a snug fit with factory clips. [cite:0_5] |
| Heat Gun | Shaping and molding plastic. | Helps achieve custom angles and contours. [cite:0_5] |
| Sandpaper/Deburring Tool | Smoothing edges after cutting. | For a professional finish and safety. |
| Fasteners (Screws, Washers, Nuts, Rivets, Push Pins) | Securing the mud flaps to your UTV. | Self-tapping sheet metal screws or factory clips work well. [cite:1_3] |
| Cardboard for Templates | Creating a precise pattern. | Free and easy to work with. |
DIY Mud Flap Installation: Step-by-Step for Your Honda Pioneer 🏎️💨
Ready to get your hands dirty (but prevent future dirt)? Let’s walk through the DIY process. This general guide can be adapted for various Honda Pioneer models, from the 500 to the 1000-6. [cite:0_1, 1_5]
Step 1: Prep Your Pioneer 🧼
Clean the fender areas thoroughly where the mud flaps will be installed. This ensures better adhesion for any temporary tape and prevents debris from interfering with your measurements. Remove wheels if necessary for easier access. 🧹
Step 2: Create Your Template 📏
This is arguably the most crucial step. Use cardboard to create a template that matches the contours of your Pioneer’s fender wells. Experiment with different sizes and shapes to achieve your desired coverage. [cite:3_4] Consider how much wider and longer you want the flaps to extend beyond the stock fenders. For front mud guards, one user found that a 36″ by 24″ mud flap split lengthwise worked great for keeping mud off the sides. [cite:1_3]
Step 3: Transfer and Cut the Material ✂️
Once your template is perfect, trace it onto your chosen material (HDPE, ABS plastic, or rubber). Use a jigsaw for cutting. For smoother, cleaner edges, especially with HDPE, a table saw is highly recommended if available. [cite:0_5]
Step 4: Shape and Finish Edges 🔥
If using ABS or HDPE, a heat gun can be your best friend for molding the plastic to match any complex curves or angles of your Pioneer’s fenders. [cite:0_5] This helps achieve a more factory-like fit. After cutting, smooth all edges with sandpaper or a deburring tool for a professional look and to prevent any sharp hazards. ✨
https://www.youtube.com/watch?v=3R1t6M_6aQ8
Step 5: Drill Mounting Holes 🕳️
Place your finished mud flap template back onto your UTV and mark the locations for mounting holes. For attaching to the fender, self-tapping 3/4″ sheet metal screws are a common choice. [cite:1_3] If reusing factory clips, a 5/16″ drill bit often provides a snugger fit than the recommended 3/8″. [cite:0_5]
Step 6: Install Your New Mud Flaps ✅
Secure your custom mud flaps using your chosen fasteners. Ensure they are mounted securely and have enough clearance for wheel travel and suspension compression. Don’t overtighten plastic components. For some rear installations, you might need two people to ensure proper alignment and tightening.
The beauty of DIY is that you can adjust the coverage to your exact specifications, whether you’re looking for minimalist protection or maximum roost deflection!
Fender Flares vs. Mud Flaps: Understanding the Difference 🧐
Often used interchangeably, fender flares and mud flaps actually serve slightly different, yet complementary, purposes. Understanding this distinction is key to choosing the right protection for your Honda Pioneer. 🤔
Fender flares typically extend your existing fenders outward and downward.
They are usually made of rigid plastic or composite material and bolt directly to the fender, providing broader coverage and often accommodating larger tires.
Products like MudBusters offer fender flares specifically for Honda Pioneer models.
Mud flaps, also known as splash guards, are generally flexible rubber or heavy vinyl panels that hang behind your tires.
Their primary role is to catch the “rooster tail” of mud and debris before it sprays everything behind you.
For ultimate protection, especially on a robust machine like the Honda Pioneer, a combination of fender flares and mud flap extensions (often called a “system”) offers the best of both worlds.
For example, SAUTVS and POKIAUTO both offer extended rear fender flares for the Honda Pioneer 1000 models (2016-2025) that essentially act as wider mud guards, providing significant coverage.
“Combining mudflaps and fender flares is generally acceptable, but you need to verify the local road safety guidelines in your area if this style is allowed.”
This highlights the importance of checking local regulations, particularly if your custom setup significantly alters your UTV’s width. 🌍
https://www.youtube.com/watch?v=Xh1jFz6hL20
Maintaining Your Custom Mud Flaps and Pioneer 🧼
Congratulations! 🎉 You’ve successfully installed your custom mud flaps. Now, let’s talk about keeping them, and your Pioneer, in top shape. Regular maintenance is key to extending the life of your DIY modifications. 💪
- Regular Cleaning: After every muddy ride, spray down your mud flaps and fender wells to prevent mud from drying and hardening. This not only keeps your UTV looking good but also prevents undue stress on your mounting points. 🚿
- Check Fasteners: Periodically inspect all screws, clips, and bolts to ensure they are tight. Vibrations from off-roading can loosen fasteners over time. A quick check can prevent a lost mud flap! 🔩
- Inspect for Damage: Look for any cracks, tears, or excessive wear on your mud flaps, especially if you frequently encounter rocky or harsh terrain. Replace damaged sections as needed. 🔍
“With fender flares deflecting all kinds of dirt and debris, you won’t have to clean as much crap off your machine after every ride.” [cite:3_3]
This statement rings true for well-designed mud flaps as well! Less cleaning means more riding. 🥳
The Honda Pioneer 1000-6, for instance, has many “nooks and crannies” that can pack with mud and become a “pita to clean.” [cite:1_4] Your DIY mud flaps will significantly alleviate this common problem. 🙌
External Resources for the Avid Off-Roader 🌐
For more insights and to stay connected with the Honda Pioneer community, check out these high-authority resources:
- Official Honda Pioneer Site: Explore the latest models and official accessories.
- HONDASXS – The Honda Side by Side Club!: A vibrant community for discussions, tips, and DIY projects. [cite:0_5, 1_4]
- MudBusters Honda Pioneer Fender Flares: See what aftermarket options are available for various Pioneer models, including 2024-2026 compatibility. [cite:0_1]
- UTV Source Mud Flaps & Accessories: A broad selection of UTV mud flap options and materials. [cite:2_3]
- Rokslide Forum – Side by Sides: General UTV discussions, including performance in mud and water. [cite:1_1]
Conclusion: Ride Cleaner, Ride Harder! 🏁
Equipping your Honda Pioneer with DIY mud flaps is a rewarding project that offers immense practical benefits. From keeping your UTV immaculate to protecting vital components, this upgrade is a game-changer for any off-road enthusiast. 🌟
Armed with the right materials, tools, and this step-by-step guide, you’re ready to tackle any trail with confidence, knowing your Pioneer is protected. Plus, the satisfaction of riding with custom-made gear is unbeatable! 😎
So go ahead, unleash your inner fabricator, and prepare your Honda Pioneer for a cleaner, wilder adventure in 2024, 2025, and beyond!
Happy trails, and may your roost be ever contained! 🌲🏞️🛣️